 Loading... Please wait...
- Home
- Trucking Directories
-
Truckers News Feed
- Semi Truck Accidents News Reports
- Bus Accidents News Reports
- Current USA Diesel Fuel Prices
- Take Our Border Back Convoy News Coverage Live Streams Schedule Route Activities
- USA Real Time Road Conditions
- FMCSA DOT CDL News Regulations Enforcement Actions
- Trucking Companies Driver Scams Ripoffs Hiring Training Leasing
-
Video Library
- EXTREME Big Rig Truck Wrecks Crashes Accidents Videos
- Custom Big Rig Semi Truck Videos
- Tutorial Video National Registry Medical Examiner
- Big Rig Trucker Training Videos
- Heavy Haul Trucking Big Rig Videos
- FasterTrucks Road Train Videos
- Perils of Speed Limiters in Big Rig Trucks Videos
- Global Truckers Videos
-
Articles
- Top 50 Tips Every Truck Driver Should Know
- Truck Driver Safe Driving Rules
- Downsides of Driving a Truck in Winter
- How to Find a Truck Driving School
- Top 5 Characteristics Successful Truck Drivers
- Truck Driver Accident Procedures
- Owner Operator Tax Deductions
- DOT CDL Commercial Vehicle Inspection Procedures
- HOS New Hours of Service Rules FAQ Truckers
- SafetyPass Pro
- Search Trucking
- Contact Us

Truck Driver Safe Driving Rules
Best Safe Driving Tips for Truck Drivers. Watch Videos, See what happens when safe driving rules are violated.
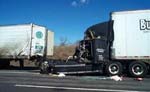
News Reports Truck Accidents

World Wide Coverage. Recent Truck Accident News Reports on Semi Truck Crashes and Big Rig Wrecks.
DOT Truck Inspection Procedures
North American Standard Level I DOT Inspection Procedures.

CDL Drivers DOT Medical Exam Form MCSA-5875 PDF
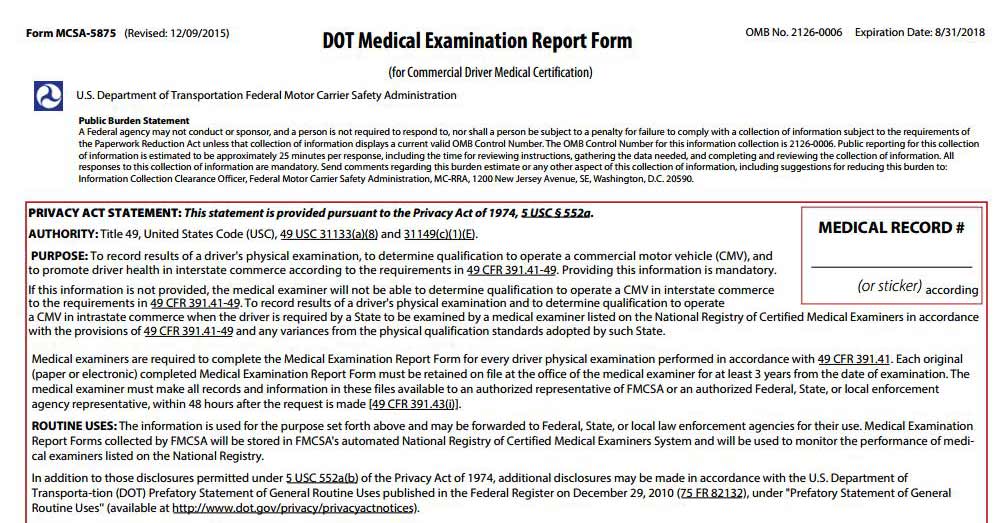
Current Form & Medical Card
Free to Print or Download.Videos How To Chain Up Big Trucks Tire Chains Instructions
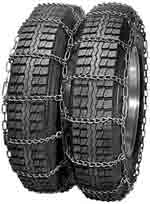
Videos - Learn How To Chain Up a Big Rig Semi Truck or 18 Wheeler. Experienced Truck Drivers Show You How to do it. Single Tire Chains and Double Tire Chains (Three-Railers) Installation Instructions.
DOT CDL Commercial Vehicle Inspection Procedures
 Every year, during the first week of May and usually on a Tuesday, Wednesday and Thursday, the CVSA (Commercial Vehicle Safety Alliance) holds the annual sting operation code named “Roadcheck”. During the 72-hour event approximately ten thousand federal, state, provincial and local truck and bus inspectors hold inspection operations throughout the USA, Canada and Mexico using North American Standard Level I Inspection Procedures.
This year’s focus will be on vehicle brake systems and preventing driver fatigue by conducting hours-of-service compliance checks. Seatbelt compliance will also be a priority.
North American Standard Level I Commercial Vehicle Inspection Procedures
 Be Proactive and inspect your vehicle thoroughly before pulling in for inspection. According to the CVSA, if you are placed "Out of Service" the cost will average $861.00, which does not include charges for fines or emergency service repairs as a result of the inspection.
1. PREPARE THE VEHICLE AND DRIVER
Instruct the driver to remain at the controls, shut down the engine (allow cool down time for turbo-charged engines). Place chock blocks in position beginning on the drivers side, one in front and one behind the drive axle tires or between the axles. Advise the driver the wheels have been chocked. Have the driver place the transmission in neutral and release all brakes. Advise the driver in the use of hand signals. (Lamps and brakes).
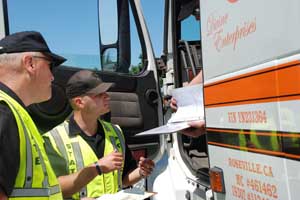
2. CHECK DRIVER'S REQUIREMENTS DRIVER LICENSE (391.11)
Check for expiration date, birth date and status check. MEDICAL CERTIFICATE (391.41) Check for expiration date, corrective lenses, hearing aid and signatures.
MEDICAL WAIVER (II applicable)(391.49) Check for expiration date, make sure form is completed. Note the stated physical limitations.
RECORD OF DUTY STATUS (395.8)(395.3) Updated to last change of duty status, today's date, legible handwriting, past 7 days recorded, mileage, driving time, on duty time, vehicle numbers, carrier name and signature. "Remarks'' section may include locations of duty status change, unusual circumstances that delay the trip and shipping document numbers or the name of the shipper. Check for written authorization for interactive electronic recording devices. If applicable.
DRIVER VEHICLE INSPECTION REPORT (396.11) Check for I.D. number(s) of vehicle(s) inspected, record of defects found, if any. Check for signatures.
SHIPPING PAPERS, BILL OF LADING - Check for listings of hazardous materials indicated by the first entry or an "X" in the H.M. column or a contrasting color. Papers must be within arms reach and visible.
SEAT BELT (392.16) - Check for condition and usage.
ALCOHOL AND DRUGS (392.4) (392.5) - Check for violations.
3. CHECK FOR PRESENCE OF HAZARDOUS MATERIALS
PLACARDS - Check for the presence of placards but use caution even If none are posted.
LEAKS, SPILLS, UNSECURE CARGO. When hazardous materials are present, be especially careful with leaks, spills or unsecured cargo.
MARKINGS - Cargo tanks and portable tanks will display markings on an orange panel or placard. They should indicate the I.D. number for type of hazardous material. There are exceptions to this rule. LABELS - When containers are visible, labels will identify the hazardous materials. There are exceptions to this rule.
4. INSIDE CAB
STEERING LASH - Measure amount of steering lash and compare with out-of-service criteria.
STEERING COLUMN - Check for unsecured attachment.
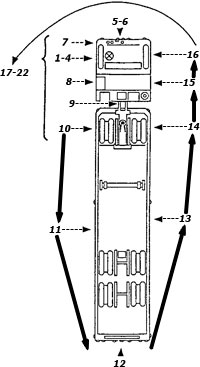
5. FRONT OF TRACTOR
HEAD LAMPS, TURN SIGNALS, EMERGENCY FLASHERS (393.25) - Check for improper color and operation.
WINDSHIELD WIPERS (393.78) - Check for improper operation. Two wipers are required unless one can clean the drivers field of vision.
WINDSHIELD (393.60) - Check for cracks or other damage. Check for decals or stickers in field of vision.
6. STEERING AXLE
INFORM THE DRIVER THAT YOU ARE GOING UNDER THE VEHICLE, AND TO LISTEN FOR YOUR INSTRUCTIONS.
STEERING SYSTEM (BOTH SIDES) - Check for loose, worn, bent, damaged or missing parts. Instruct the driver to rock the steering wheel, check key components: front axle beam, gear box, pitman arm, drag link, tie rod and tie rod ends.
FRONT SUSPENSION (BOTH SIDES) - Check for indications of misaligned, shifted or cracked springs, loosened shackles, missing bolts, spring hangers unsecured at frame and cracked or loose U-bolts. Check for unsecured axle positioning parts and signs of axle misalignment.
FRONT BRAKES (BOTH SIDES) (393.48) - Check for missing, nonfunctioning, loose, contaminated or cracked parts on the brake system, including; brake drums, brake shoes, rotors, pads, linings, brake chambers, chamber mounting brackets, push rods, and slack adjusters. Check for "S" cam flip over. Be alert for audible air leaks around brake components and air lines. With brakes released, mark the brake chamber push rod at the point where the push rod exits the brake Chamber. Mark the push rods on both sides at this time. All push rods will be measured in ITEM 17.
FRONT AXLE - Check for cracks, welds, and obvious misalignment.
FRAME and FRAME ASSEMBLY - Check for cracks, or any defect that may lead to the collapse of the frame.
7. LEFT FRONT SIDE OF TRACTOR
LEFT FRONT WHEEL AND RIM - Check for cracks, unseated locking rings, broken or missing lugs, studs or clamps. Bent or cracked rims, "bleeding" rust stains, loose or damaged lug nuts and elongated stud holes.
LEFT FRONT TIRE (393.75) - Check for improper inflation, serious cuts and bulges. Check tread wear and measure major tread groove depth. Inspect sidewall for defects. Check for exposed fabric or cord. Radial and bias-ply tires should not be mixed on the steering axle.
8. LEFT SADDLE TANK AREA
LEFT FUEL TANK(S) (393.65) - Check for unsecured mounting, leaks or other damage. Verify that the fuel crossover line is secure. Check for unsecured cap(s). Check ground below tank for signs of leaking fuel.
TRACTOR FRAME (393.201) - Check frame rails and cross members on the tractor just behind the cab, look for cracks, bends or excessive corrosion.
EXHAUST SYSTEM (393.83) - Check for unsecured mounting, leaks (under the cab), exhaust contacted by fuel lines, air lines or electrical wires. Check for carbon deposits around seams and clamps.
9. TRAILER FRONT
AIR AND ELECTRICAL LINES (393.28) - Lines between tractor and trailer should be suspended and free of tangles and crimps. They should have sufficient slack to allow the vehicle to turn. Inspect line connections for proper seating. Listen for audible air leaks.
FRONT END PROTECTION (393.106) - Check for height requirements. (Note exceptions).
10. LEFT REAR TRACTOR AREA
WHEELS, RIMS AND TIRES - Inspect as described in ITEM 7. Check inside tire of dual for inflation and general condition. Tires should be evenly matched (same circumference) on dual wheels. Without placing yourself between the tires on tandem axles, check for debris between the tires.
LOWER FIFTH WHEEL (393.70) - Check for unsecured mounting to the frame or any missing or damaged parts. Check for any visible space between the upper and lower fifth wheel plates. Verify the locking jaws are around the shank and not the head of the kingpin. Verify the release lever is seated properly and that the safety latch is engaged.
UPPER FIFTH WHEEL - Check for any damage to the weight bearing plate and its supports on the trailer. Check king-pin condition.
SLIDING FIFTH WHEEL - Check for proper engagement of the locking mechanism (teeth fully engaged on rail). Check for worn or missing parts, making sure that the position does not allow the tractor frame rails to contact the landing gear during turns.
INFORM THE DRIVER THAT YOU ARE GOING UNDER THE VEHICLE. ENTER THE UNDERCARRIAGE IN VIEW OF THE DRIVER.
SUSPENSION (BOTH SIDES) - Inspect as described in ITEM 6. Check for deflated or leaking air suspension systems.
BRAKES (BOTH SIDES) - Inspect as described in ITEM 6. With brakes released, mark the push rods.
11. LEFT SIDE OF TRAILER
FRAME AND BODY - Check for cracks and any indication leading to the collapse of the frame.
CARGO SECUREMENT (393.100) - Check for improper blocking or bracing, unsecured chains or straps. Verify end gates are secured in stake pockets. Check tarp or canvas.
WHEELS, RIMS AND TIRES - Inspect as described in ITEM 7.
SLIDING TANDEM - Check for misalignment and position. Look for damaged, worn or missing parts. Check locking mechanism. Teeth of locking mechanism must fully mesh with those of the rail secured to the frame.
INFORM THE DRIVER THAT YOU ARE GOING UNDER THE VEHICLE. ENTER THE UNDERCARRIAGE IN VIEW OF THE DRIVER.
SUSPENSION (BOTH SIDES) - Inspect as described in ITEM 6.
BRAKES (BOTH SIDES) - Inspect as described in ITEM 6. With brakes released, mark the push rods.
12. REAR OF TRAILER
TAIL, STOP, TURN LAMPS AND EMERGENCY FLASHERS - Check for improper color and operation.
CARGO SECUREMENT - Inspect as described in ITEM 11. Also check tailboard security. Verify end gates are secured in stake pockets and rear doors are closed. Check both sides of trailer to insure protection of cargo from shifting or falling.
13. RIGHT SIDE OF TRAILER
Check all Items as on the left side.
14. RIGHT REAR TRACTOR AREA
Check all Items as on the left side.
15. RIGHT SADDLE TANK AREA
Check all Items as on the left side.
16. RIGHT FRONT SIDE OF TRACTOR
Check all Items as on the left side.
17. BRAKE ADJUSTMENT CHECK
INFORM THE DRIVER THAT YOU ARE GOING UNDER THE VEHICLE. ENTER THE UNDERCARRIAGE IN VIEW OF THE DRIVER.
MEASURE PUSH ROD TRAVEL (ALL BRAKES) - While the brakes are applied, move around the vehicle and measure the distance of push rod travel at each chamber. Write down each push rod measurement and compare them to the out-of-service criteria for the appropriate size and type of brake chamber. Again, listen for leaks as you move around the vehicle.
18. FIFTH WHEEL MOVEMENT CHECK
USE CAUTION - If conducted improperly, this method of checking for fifth wheel movement can result in serious damage to the vehicle. Use caution and instruct the driver carefully.
PREPARE THE VEHICLE AND DRIVER - Have the driver put the vehicle in gear, release the service brakes and apply the trailer brakes. Remove the wheel chocks and have the driver start the vehicle. Carefully explain the procedure to the driver. Tell the driver to GENTLY rock the tractor as you watch the fifth wheel.
CONDUCT THE PROCEDURE - As the tractor rocks, watch for movement between the mounting components and frame, pivot pin, bracket and upper and lower fifth wheel halves.
19. AIR LOSS RATE
WHEN TO CONDUCT THE TEST - If you heard an air leak at any point in the inspection, you should now check the vehicle's air loss rate.
CONDUCT THE PROCEDURE - Have the driver run the engine at idle, then apply and hold the service brake. Observe the air reservoir pressure gauge on the dash. Have driver pump the pressure down to 80 psi. Compressors do not activate until system pressure drops below a certain level. At about 80 lbs most compressors should be operating. Air pressure should be maintained or increase. A drop in pressure indicates a serious air leak in the brake system and the vehicle should be placed out of service.
20. LOW AIR PRESSURE WARNING DEVICE
TEST THE WARNING DEVICE - Instruct the driver to pump the air down until the low air pressure warning device activates. Observe the gauges on the dash. The low air pressure warning must activate at a minimum of ½ the compressor governor cut out pressure, approximately 55 psi.
21. TRACTOR PROTECTION VALVE
This procedure will test both the tractor protection valve and the trailer emergency brakes.
CONDUCT THE TEST - Instruct the driver to release the emergency brakes by pushing in the dash valves. Break the supply emergency line at the hose couplers between the tractor and trailer. When the line is disconnected a blast of air will be noticed. At this point, the emergency brakes on the trailer should set up.
OBSERVE THE DASH GAUGE - Air will leak from the tractor side of the line until the pressure in the tractor's system drops to the 20-45 psi range. At this point, the air loss should stop, isolating the tractor air system. A loss of air in the tractor system below the 20-45 psi range indicates a malfunctioning tractor protection valve. If the trailer brakes do not set up when the line is disconnected, there is a problem with the trailer emergency brakes.
22. SPEED LIMITERS
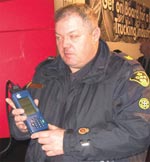 CANADA - ONTARIO, QUEBEC ONLY. Check Electronic Truck Speed limiters and Cruise Control. Must be set no higher than 65mph (105kph). Tire size, transmission gear ratio and rearend gear ratio must also be programmed properly to match truck specifications as listed on the ID plate, usually located on the driver's door jamb.
23. COMPLETE THE INSPECTION
COMPLETE PAPER WORK - Complete inspection forms and other paperwork as required.
CONCLUDE WITH THE DRIVER - Explain any violations or warnings to the driver. Take appropriate enforcement if necessary.
APPLY C.V.S.A. DECAL - Apply a C.V.S.A. decal on all vehicles that qualify.
Tags: RoadCheck Commercial Vehicle Inspections, sting operation code named “Roadcheck”, Canada Electronic Truck Speed limiters and Cruise Control Laws, North American Standard Level I Commercial Vehicle Inspection Procedures, Federal CVSA FMCSA Truck and Bus Inspections